Sunday, February 27, 2011

Lots O'Veggies Shepherds Pie

For a few years now, I've subtly been trying to turn my mother into a vegetarian or even a vegan. While she hasn't fully embraced the lifestyle, she regularly cooks dishes from the vegan cookbooks I give her for Christmas (she get's things she actually wants too, don't worry), often with more than satisfactory results. She was particularly happy when she made the "caulipots" from Isa Chandra Moskowitz's Appetite for Reduction. I had to agree with her: mixing cauliflower into your mashed potatoes makes for a dish that is lighter and, in my opinion, better than the original. She had unveganized them by layering them in a casserole with cod (baby steps, Mom) which gave me the idea to use them in a shepherd's pie of sorts.

I confess I've never had traditional meaty shepherds pie. My mother never made it when I was a kid,  you'd be hard pressed to find it in Spain and by the time I moved to the US I hadn't eaten meat for years. I put together my limited memories of shepherd's pie and some knowledge gained through a bit of internet research to come up with the recipe I've included below. Each of the three layers would make a good side dish on its own, but the combination of all three brings a little extra comfort and deliciousness to the table.


Lots O'Veggies Shepherds Pie
Makes 6 Servings

Tomatoey Chickpeas
  • 2 15 oz or 425 g cans / 3 cups cooked chickpeas
  • 9.5 oz / 270 g / 1.5 cups tomatoes (I used grape tomatoes), chopped
  • 1/4 cup sun dried tomatoes, chopped
  • 1 teaspoon dried rosemary
  • 1/2 teaspoon dried basil
  • 1/2 teaspoon salt
  • 1/4 teaspoon ground black pepper
  • 1 tablespoon olive oil
1. Drizzle the olive oil into the bottom of a baking or casserole dish.  I used a 9 by 13 inch dish; if you're making shepherd's pie you'll want to use something at least that large.
2. Mix all the ingredients together in the baking dish. Taste and adjust seasonings.

Caulipots (or Cauliflower Mashed Potatoes)
Adapted from Caulipots in Isa Chandra Moskowitz's Appetite for Reduction
  • 3/4 head cauliflower, cut into florets
  • 1 lb / 490 g potatoes (I used a mix of red and russet), scrubbed or peeled and cut into bite-size pieces
  • 1/4 non-dairy milk or veggie broth
  • 2 tablespoons olive oil
  • 5 cloves garlic, minced
  • 2 tablespoons thyme
  • 1 tablespoon marjoram or oregano
  • 2 teaspoon salt
  • 1/4 teaspoon pepper
  • Optional: 1 tablespoon nutritional yeast
1. In a large pot, bring enough water to cover the potatoes and cauliflower to a boil. Once the water is boiling, add 1 teaspoon of salt and the potatoes. Cook them for about 10 minutes or until almost fork tender.
2. While the potatoes are cooking, heat the olive oil over medium heat in a large pan (which we'll reuse without washing for the saucy 'shrooms, onions and spinach). Add the garlic and spices, cooking until the garlic is starting to brown and the spices are fragrant.
3. Add the cauliflower to the pot with the potatoes and cook for 3-4 minutes or until fork tender.
4. Drain the potatoes and cauliflower. Put them back in the pot you boiled them in. Add in the spice, oil and garlic mixture along with all the other ingredients. Mash with a potato masher until you reach your desired consistency. If you like your mashed potatoes really smooth you could use the food processor.

Saucy 'Shrooms, Onions and Spinach
  • 10 oz / 280 g of cremini or other mushrooms, wiped clean with a damp towel and sliced
  • 1 medium onion, thinly sliced
  • 2 packed cups spinach
  • 1/3 cup vegetable broth or white wine
  • 2 tablespoons bread crumbs
  • 1 teaspoon thyme
  • 1/2 teaspoon salt
  • 1/4 teaspoon ground black pepper
  • 1 tablespoon olive oil
1. In a large saute pan (the same one we used for the "caulipots"), heat the olive oil over medium-high heat. Add the onions and saute until they start to get translucent, or 3-4 minutes.
2. Bring the heat down to medium. Add the mushrooms and saute, stirring frequently, until they start to brown, which should take around 5 minutes.
3. Add the bread crumbs, thyme, salt and pepper, stirring to make sure all ingredients are evenly mixed. Cook, stirring occasionally, for a couple minutes.
4. Add the vegetable broth or white wine and cook until about half of the liquid has evaporated, or about 4 minutes.
6. Remove the saute pan from the heat and add the spinach. Stir the spinach into the other ingredients until it starts to wilt.

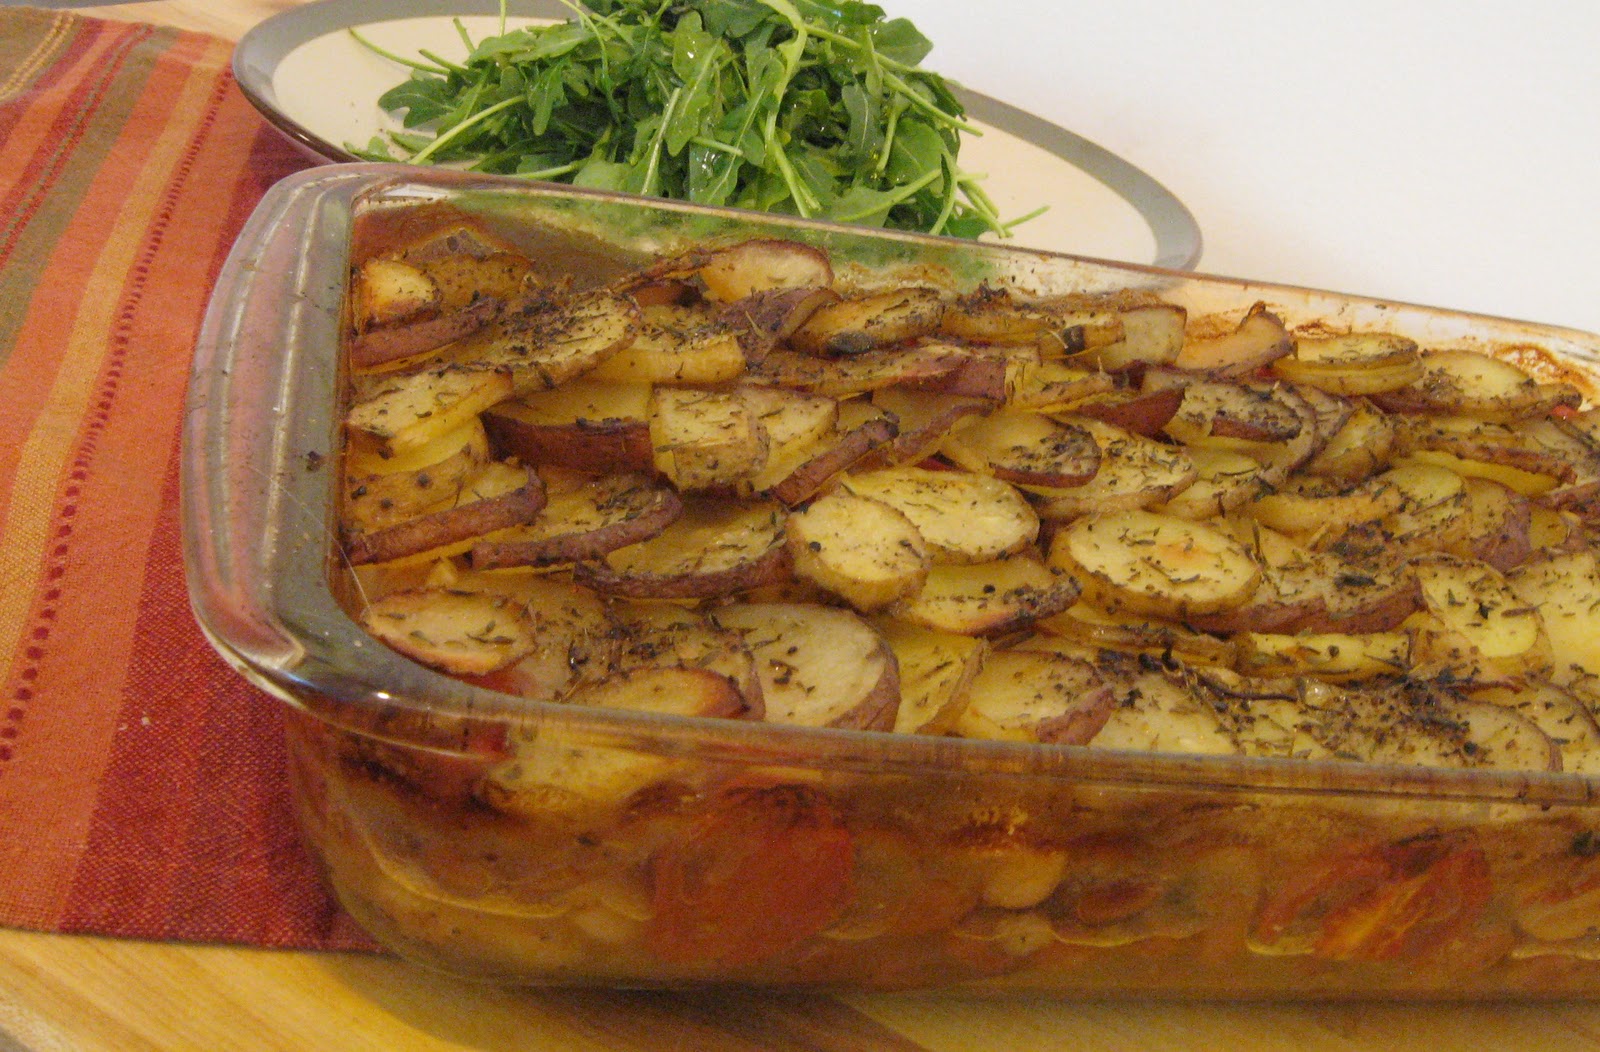
Shepherd's Pie Assembly and Baking
1. Preheat the oven to 350 F /175 C.
2. Layer the onion, mushroom and spinach mixture on top of the tomatoey chickpeas, which should already be sitting in your casserole dish.
3. Spoon the "caulipots" on top of the mushroom layer, smoothing them out with a spatula.
4. Bake for about 30 minutes or until the potatoes start to brown.

Saturday, February 26, 2011

Plan Ahead Pizza

Most people, myself included, automatically associate pizza with cheese. I'm avoiding cheese since the new year so I had to come up with an alternative to put on top of my old favorite. One option was Daiya, which seems to be the new favorite vegan alternative to cheese. Thanks to its tapioca, vegetable glycerin and xantham gum, it melts like real cheese. While this sounds like exactly what I would need for a pizza, I try to stay away from processed products (as the "for real" part of the blog tittle indicates), even if they're vegan. I instead decided to make a version of Choosing Raw's Goat "Cheese". I'm not going to pretend it's even close to mozzarella, but it certainly does the trick when baked on a homemade crust and topped with a ton of delicious veggies.


Overnight Pizza Dough
Inspired by Jim Lahey's No-Knead Bread

Makes 1 approximately 16-inch diameter crust
  • 13.5 oz / 380 g / 3 cups all purpose flour
  • 9 oz / 255 g / 1 1/4 cups water
  • 1 1/2 teaspoon salt
  • 1 teaspoon instant of fast-acting yeast
  • 2 tablespoons olive oil
1. Mix the flour, yeast and salt in large bowl.
2. Add the water, warmed approximately to the temperature indicated on the yeast package if you want to do it by the book. When it comes to water temperature, err on the side of caution; if your water is too hot it will kill the yeast and your dough won't rise. I confess that I used cold water -- I wasn't paying attention -- and it didn't really make a difference due to the long rising time.
3. Mix the ingredients together until they form a smooth dough. No need to knead (ha!) the dough because we're going to let the yeast do the work for us.
4. Coat the dough in the olive oil, cover it and let it rest in warm place for 12-24 hours. I realize this is a long time, but if you plan ahead it won't be a big deal.
5. Preheat your oven to 450 F / 230 C. If using a pizza stone, put it in the oven. Punch down the dough and roll it into your desired shape, using some flour or oil to keep the dough from sticking. Once the oven is hot, place your dough on a greased baking sheet or, in my case, a very seasoned pizza stone sprinkled with some cornmeal. Add your sauce, "cheese", and toppings (I used shiitake mushrooms, fresh and sun dried tomatoes, sliced garlic, onions, peppers and spinach).
6. Bake for 12-18 minutes, or until the dough is cooked through. Optionally, top your finished pizza with some crushed red pepper.

Cashew-Macadamia "Cheese"
Inspired by Choosing Raw's Goat "Cheese"
Makes about 2 1/2 cups
  • 1 cup raw macadamia nuts
  • 1 cup raw cashews
  • 2 teaspoons of miso
  • Juice of 1/2 lemon
  • 1/2 teaspoon dried basil
  • 1/4 teaspoon ground black pepper
  • 3/4 teaspoon salt
  • 1 tablespoon nutritional yeast
  • About 3 tablespoons water
1. Soak cashews and macadamia nuts in water for 8-24 hour. If you can, change the water half way through. Drain the nuts. 
2. Blend all ingredients together in the food processor until smooth. This can take several minutes of processing and scraping down the sides frequently.
3. Store your "cheese" in the fridge. You can spread it on wraps or sandwiches, crumble it into a salad or use it to top a pizza.

Thursday, February 24, 2011

Mom's Tabbouleh

For as long as I can remember, my mother has regularly made tabbouleh. I imagine this was one of her go-to dishes for a number of reasons. For one thing, it's an ideal dish to prepare on the weekend to eat over several days after because it keeps very well in the fridge. It is also perfect for Madrid's numerous warm months, when you need a side that is heartier than a conventional salad but still light and refreshing. Lastly, if you use couscous instead of bulgur wheat it comes together in a snap. This short cut hasn't changed my opinion of my mother's rendition of tabbouleh. Over the years I've had many different renditions of the dish, some probably more authentic than my mom's, but the one thing that has been missing from all of them is the taste of home.


Mom's Tabbouleh
Makes 4-6 servings
  • 1 cup couscous
  • 1 cup water
  • 1/2 cup chopped shallots or onions
  • 1 heaping cup of halved grape tomatoes or chopped tomatoes
  • 1 bunch or about 1 cup packed parsley, chopped
  • 1 bunch or about 1 cup packed mint, chopped
  • 1 1/4 teaspoon salt
  • 1/4 cup plus 1 tablespoon extra virgin olive oil
  • 1/2 cup lemon juice (I used 1 1/2 lemons)
  • 1/2 teaspoon ground black pepper
  • 1/2 teaspoon cumin
1. In a small pot, bring the water to a boil. Add the salt, 1 tablespoon of oil and the couscous. Remove from the heat and stir quickly. Let the couscous sit covered for about 5 minutes.
2. Add the parsley, mint, tomatoes and shallots to a large salad bowl.
3. Right in the measuring cup, mix the oil, lemon juice, the remaining 1 teaspoon salt, pepper and cumin. Mix the dressing vigorously until emulsified.
4. Fluff up the couscous with a fork and add it to the salad bowl.
5. Pour the dressing over the salad and toss until it's evenly distributed.
6. Optionally, cover the salad and let it chill in the fridge for 30 minutes to a few hours to let the flavors develop.

Wednesday, February 23, 2011

Chipotle Portobello Chili

When I landed in RDU airport on my way back from a very intense Christmas vacation in Madrid I was tired, cranky and, most importantly, hungry. Two things made me instantly feel  better: seeing Austin waiting for me and him mentioning that there was a pot of chili waiting for us at home. When questioned about the origin of said chili, Austin revealed he had used Emeril Lagasse's Vegetarian Chili recipe. As soon as we got home, we heated up the delicious stew and started eating immediately. It may have been the state I was in, but I thought it was the most delicious chili I had ever had (and I eat chili a lot!).

Because of the comfort this chili had brought me in a time of need, I decided to make it for a sick Austin tonight. Even though Emeril's chili is amazing as it is, I couldn't resist the urge to tinker with the recipe. I wanted to incorporate one of my favorite ingredients in Southwestern and Mexican cooking -- chipotle in adobo. These days you can thankfully find cans of these smoked jalapeños in the Hispanic section of almost any grocery store. Since I rarely use a whole can at once, I store leftovers in ziploc bags in the freezer. You can also find chipotles in ground form, perfect for when you want a hint of their flavor and don't need the whole peppers. Chipotle's smoky flavor makes stews, barbecue sauces and the like taste as if they've been simmering for half a day when they really only spent an hour on the stove top.  In addition to the chipotle, I also added some cinnamon and unsweetened cocoa powder to the chili, both widely used in savory Mexican dishes.

Some ingredients in this recipe should not be fooled around with. The use of portobello mushrooms really gives the chili some heft and earthiness. The corn, which can be fresh or frozen, lends the chili some essential sweetness. Lastly, chili isn't really chili without lots of ground chili powder and cumin. As with most any recipe I post here that isn't a baked good, feel free to adapt the recipe below to suit your needs and your pantry.


Chipotle Portobello Chili
Adapted from Emeril Lagasse's Vegetarian Chili
Makes about 6 servings 
  • 1 medium onion, chopped
  • 1 red bell pepper, chopped
  • 4-5 cloves of garlic, minced
  • 3 chipotles in adobo, chopped and seeded if you don't like heat
  • 1 tablespoon adobo sauce from chipotles
  • 1 medium zucchini, peeled and diced
  • 2 cups frozen or fresh corn
  • 4 large portabello mushrooms, stems removed, wiped with a damp cloth and cubed
  • 2 15 oz cans or 3 cups of cooked black beans 
  • 1 tomato, chopped
  • 1 28 oz can of whole or chopped tomatoes, juices included
  • 1 cup vegetable stock
  • 2 tablespoons olive oil
  • 2 tablespoons chili powder
  • 1 tablespoon ground cumin
  • 1 teaspoon ground chipotle or cayenne pepper
  • 1/2 teaspoon cinnamon
  • 1 teaspoon unsweetened cocoa powder
  • 1 1/2 teaspoon salt
  • 1/2 cup cilantro, chopped and packed
  • Optional: cubed avocado for garnish
1. Heat the oil in a large pot over medium-high heat. Toss in the bell pepper, garlic and onion. Cook until the onions are starting to become translucent, about 3 minutes.

2. Add the portobellos, corn and zucchini. Cook, stirring occasionally, until the vegetables soften and begin to brown in some spots.

3. Add the chili powder, cumin, chopped and dried chipotle, adobo sauce, cocoa, cinnamon and salt. Stir until all the ingredients are coated in the spices.

4. Mix in the stock, beans and the tomatoes, both fresh and canned. If using whole canned tomatoes, break them up with your hands first. Bring the mixture to a boil, then reduce the heat and simmer for about 25 minutes.

5. Take the pot off the heat and add the cilantro. Serve with bread for dunking or over rice. Optionally garnish with avocado.

Tuesday, February 22, 2011

Boulagerie Beans and Potatoes

Traditional boulangerie (or bakery) potatoes are practically the definition of slow food. They used to be cooked in bakers' bread ovens for hours, until the potatoes had almost melted into the stock. You can make a perfectly good version of this dish at home, so don't despair if you don't have a bread oven handy. You can't, however, take a short cut with the baking time. This dish takes a good 2 hours from start to finish, making it perfect for a Sunday dinner.

I learned about boulangerie potatoes from Mark Bittman's "How to Cook Everything Vegetarian".  This book is heavy enough to kill someone if you chuck it at them, but with good reason. It is, in my opinion, the most comprehensive guide to vegetarian cooking available. Not only does it have hundreds of recipes enriched with countless variations, but it also includes various sections on cooking techniques, from how to prepare dried beans to how to assemble veggie sushi rolls. In his version of the dish, Bittman uses a combination of beans and potatoes. He also provides a variation with tomatoes, which is my favorite. Boulangerie beans and potatoes make for a complete and comforting meal when served alongside some vegetables or a salad.

I served this with a side of my absolute favorite salad. Putting it together is so simple that I can't in good conscience call it a recipe: toss together lots of fresh arugula, a bit of salt, a generous amount of freshly ground pepper, a healthy drizzle of olive oil and lemon juice to taste.  It is especially good sprinkled with some almesan with nutritional yeast added to it. I crave this salad like I crave chocolate but your love for it will depend on how obsessed you are with arugula. 

Boulangerie Beans and Potatoes
Makes about 4 servings
  • 1 15 oz / 425 g can pinto or kidney beans, drained and rinsed
  • 1 15 oz / 425 g can canellini or other white beans, drained and rinsed
  • 1 lb potatoes (I used a combination of young read and yellow potatoes, but more robust baking potatoes will work fine), sliced into 1/8 inch / 3 mm thick half moons
  • 1 cup halved grape or cherry tomatoes
  • 1/4 cup of sun dried tomatoes (I used the kind packed in oil), chopped coarsely
  • 3 cloves of garlic, minced
  • 1 cup vegetable stock (reduce to 3/4 cup if also using wine)
  • 3 tablespoons olive oil
  • 1 1/2 teaspoon salt
  • 1 teaspoon pepper
  • 1 teaspoon dried thyme or 1 tablespoon fresh thyme
  • 1/2 teaspoon dried rosemary or 1/2 tablespoon fresh rosemary
  • Optional: About 1/3 cup white wine
1. Preheat the oven to 325 F / 160 C.
2. Drizzle the bottom of a casserole dish with about 1 tablespoon of olive oil. Put the beans, tomatoes, sun dried tomatoes in the bottom of the dish and sprinkle them with 1 teaspoon of salt, 1/2 teaspoon of black pepper and 1/2 teaspoon of thyme. Mix, taste and adjust the seasoning if needed. Note: I used a 7 x 11 inch Pyrex dish but an 8 x 13 inch dish would work too, just don't use anything bigger than that or you won't get a nice layered presentation.
3. Arrange the sliced potatoes in slightly overlapping lines until the tomato and bean mixture is covered.
4. Pour the vegetable stock over the potatoes. If using white white wine, drizzle it evenly over the potatoes.
5. Season the potatoes with the remaining 1/2 teaspoon of salt, 1/2 teaspoon of pepper and 1/2 teaspoon of thyme and drizzle them with remaining 2 tablespoons of olive oil (plus a little extra if you're feeling decadent).
6. Cover the baking dish with aluminum foil and bake undisturbed for 1 hour.
7. Uncover the dish and cook for another 45 minutes. By this time the potatoes should be nice and brown and most of the liquid should have evaporated. Serve immediately.

Monday, February 21, 2011

White Chocolate Chip Chai Cookies

I was sixteen and at WPI nerd camp when a fellow camper gave me my first taste of chai. Relatively uninitiated in the world of tea, I found the slightly spicy drink positively exotic. Looking back, I realize that I got hooked on the drink by a bastardized chai-like beverage that was a far cry from the traditional Indian blend of black tea and spices. Authentic masala chai is only slightly sweet and is usually prepared with just a bit of milk, unlike the concoctions most of us know as chai. The truth is I love chai in all of its versions, which is why I set off to make cookies reminiscent of it.

I confess that these cookies don't contain any actual chai tea. They do, however,  contain a mix of spices that gives them a similar taste and aroma. The addition of white chocolate and vanilla lends the cookie the richness that characterizes more Americanized chai. These cookies will be crunchy on the outside and soft on the inside if you bake them for the time I indicated in the recipe. If you prefer crunchy cookies, bake them for a couple more minutes, watching them closely so they don't get too brown, and if you want them softer, decrease the baking time by a couple minutes.


White Chocolate Chip Chai Cookies
Makes about 18 cookies
  • 1 cup whole wheat flour
  • 1 cup plus 2 tablespoons all purpose white flour
  • 2/3 cup brown sugar, packed
  • 1/4 cup pure maple syrup
  • 1/4 cup soy or other non-dairy milk
  • 1/2 cup canola oil
  • 1 teaspoon pure vanilla extract
  • 3.5 oz / 100 g / 3/4 cup chopped white chocolate
  • 1 teaspoon baking soda
  • 1/2 teaspoon baking powder
  • 1/4 teaspoon salt
  • 1/8 teaspoon ground ginger
  • 1/8 teaspoon ground cloves
  • 1/4 teaspoon cinnamon
  • 1/8 teaspoon ground nutmeg
  • 1/8 teaspoon allspice
  • Generous pinch ground black pepper
1. Preheat the oven to 350 F or 175 C. In a large bowl, mix the flour, spices, salt, baking powder and baking soda. In a medium bowl, whisk the brown sugar, maple syrup, vanilla, oil and milk together until combined. Add the chopped white chocolate to the liquid mixture and stir until evenly distributed. Pour the liquid mixture into the dry ingredients and mix using a spatula until the dough comes together.

2. Line a cookie sheet with parchment paper or grease it. Using your hands, roll the dough into golf ball sized portions and place them on the cookie sheet 12 at a time, flattening them slightly. Bake for 10 minutes. Transfer to cooling rack as soon as they come out of the oven.

Sunday, February 20, 2011

International Brunch

On Valentine's Day Austin absolutely insisted that I make parathas to go with our Indian feast. I had been wanting to try my hand at making flatbread for a while so I rose to the challenge. They were so delicious that I've been craving them something fierce ever since. Yesterday morning I finally caved and made them again. While I contemplated eating exclusively flatbread for brunch, that seemed a little too indulgent, even for a carbivore like me. For the sake of nutritional diversity I decided to whip up a sweet potato hummus, inspired by one of Gena Hamshaw's recipes, to go with the parathas.

I topped the open-faced sandwiches with some tomatoes which were a nanosecond away from going bad and some bell pepper that was hiding, practically forgotten, in the fridge. Although this brunch required a bit more time and effort than I'm usually ready to put into anything on a lazy Saturday morning, it was incredibly tasty and kept me satiated until my late dinner.


Parathas (Indian Flatbread)
Makes 12 parathas
  • 2 cups whole wheat flour plus extra to keep the dough from sticking
  • 2/3 cup water (you may need more or less depending on your flour)
  • 1 1/4 teaspoon salt
  • 2 tablespoons of canola oil for the dough
  • 1/2-3/4 cup oil for spreading between the layers and frying
  • Optional: cumin and red pepper flakes for sprinkling in between the layers.
I used this recipe as a guide to make the dough and these instructions to assemble them. The process looks complicated but I promise it's actually quite easy and fun. After rolling the parathas into a circle, before forming the layers, I added a sprinkling of cumin and red pepper flakes. Parathas are great for open face sandwiches, sopping up saucy curries or just eating on their own.

Sweet Potato Hummus
Makes 2 1/2 to 3 cups
  • 1 small to medium sweet potato, roasted, baked or steamed
  • 1 15 oz can chickpeas, drained and liquid reserved
  • 1/2 cup chickpea canning liquid (add more if you like smoother hummus)
  • 1 tablespoon almond butter (or tahini if you'd like to go more traditional)
  • Juice of 1/2 lemon
  • 1 clove garlic, minced
  • 1/2 teaspoon cumin
  • 1/2 teaspoon chili powder
  • 2 tablespoons olive oil
  • Salt and black pepper to taste
1. Put all ingredients except for the oil in the food processor and blend until smooth, scrapping down the sides if necessary. If the mixture is too dry, add more of the canning liquid or water.
2. With the motor running, drizzle in the olive oil.
3. Serve, with another drizzle of olive oil on top if you'd like.

Saturday, February 19, 2011

Operation-Clean-Up Stir-Fry

I'm going to be honest: I didn't really feel like stir-fry last night. I sucked it up though, since I had to use up a bunch of veggie odds and ends that were sitting in the fridge, getting sadder looking by the minute. Operation-clean-up stir-fry is like a finger print: yours and mine won't be the same, since we're each dealing with our own veggies scraps. Even though the ingredients may vary, the method remains the same: quickly saute the veggies over relatively high heat, stirring often; then add your sauce; cook off some of the liquid and serve.

For the love of all that's delicious though, don't cook the life out of your veggies. For a stir-fry, they should still have some crunch and brightness to them. You can serve your veggies over rice or with noodles, for an equally satisfying meal.


Operation-Clean-Up Stir-Fry
Makes 3 servings
  • 6 oz / 170 g rice noodles
  • 3 cups dried shiitake mushrooms
  • 1/4 head cauliflower, cut into small florets
  • 1/2 of a medium onion, sliced 
  • 1/2 bell pepper, sliced
  • 1 medium carrot, cut into matchsticks
  • 1 heaping cup sugar snap peas
  • 3 cloves garlic
  • 1/3 plus 1 tablespoon of soy sauce
  • 1 tablespoon Sriracha sauce, less you're not a huge fan of heat
  • 1 tablespoon toasted sesame oil
  • 1 heaping teaspoon of grated ginger
  • 3 tablespoons water
  • 2 tablespoons of canola or peanut oil
1. Cook your noodles until slightly shy of al dente since you will be sauteing them later. Drain the noodles and then rinse them in cold water to stop the cooking process.
2. Soak your dried shiitakes until tender, then drain them. The mushrooms I used only needed about a one minute dunk because they were already sliced. If your mushrooms aren't sliced, you'll have to soak them a while longer, remove the woodsy stems and slice them.
3. In a medium pot, boil your cauliflower for about 2 minutes, just to get rid of that harsh bite.
4. Mix the soy sauce, Sriracha, sesame oil, water and grated ginger in a small bowl and set aside.
5. In a wok, large skillet or (in my case) a paella pan, heat the canola or peanut oil over medium-high heat. Toss in the veggies that take longer to cook -- the carrots and the bell pepper -- and saute for about 3 minutes.
6. Add in the shiitakes and saute for another 3 minutes, or until they start to get slightly brown in some spots.
7. Toss in the garlic and onions, cooking until the onions start to soften, which should take 2-3 minutes.
8. Mix in the cauliflower and the snap peas and saute for another 3 or so minutes.
9. Add the noodles and mix them with the veggies. After a couple minutes, add the sauce mixture and cook stirring until the sauce coats all the veggies and has been absorbed by the noodles. Serve, garnished with some extra dried shiitakes if you'd like.

Friday, February 18, 2011

Pasta for Hookers

Legend has it that Southern Italian prostitutes would lure in customers with the aroma of pasta puttanesca. After a hard day's work, they would then gather around a table and enjoy the deliciously salty, spicy and comforting dish. Now I'm not suggesting that you quadruple this recipe and start a happening brothel. You could, however, take a page from the prostitutes' book and make someone's hard day better by serving them the culinary equivalent of a warm hug.


Pasta Puttanesca
Makes 2-3 servings
  • 8 oz / 230 g of linguine or other pasta
  • 3 tablespoons of olive oil
  • 12 oz / 340 g of grape or cherry tomatoes, roughly chopped
  • 1/4 cup of sun dried tomatoes (either packed in oil or just rehydrated), chopped
  • 1/3 cup kalamata olives, roughly chopped
  • 1/2 of a medium onion, diced
  • 3 cloves of garlic, minced
  • 2 1/2 teaspoons of capers 
  • 3 tablespoons of vegetable broth (in a pinch you could use water or white wine)
  • 1/2 teaspoon black pepper
  • 1 teaspoon dried basil
  • 1/2 teaspoon dried oregano
  • 1-2 teaspoons of crushed red pepper flakes
  • 1 fist full of parsley, chopped
  • Salt to taste
  • Optional: "almesan" (or Parmesan)
1. In a large pot, bring your pasta water to a boil. Salt the water and cook the pasta according to the package instructions until al dente. 
2. In a large saute pan, heat the olive oil over medium heat. Toss in the onions and the garlic and cook until the onion starts to turn translucent or about 5 minutes.
3. Add in the sun dried tomatoes, capers, olives, black and red pepper, oregano and basil. Saute for about a minute. 
4. Toss in the tomatoes and the vegetable broth. Cook until the tomatoes start to break down, which should take around 10 minutes. You can help this process along by using a potato masher to break up any larger tomato chunks. Taste the sauce for salt. You may not need any since olives and capers are usually quite salty.
5. By this time your pasta should be cooked. After you drain it, add it to the sauce, stirring to make sure all the pasta is coated. Cook for a couple of minutes. 
6. Add the parsley, stir and serve. I topped my pasta with some "almesan". The original recipe is in Isa Chandra Moskowitz's  Veganomicon. It is basically just ground almonds, sesame seeds, salt, pepper, and lemon zest. I modified the ratio of the ingredients a bit, used lime zest instead of lemon and added some nutritional yeast. It tastes surprisingly close to the real thing.

Thursday, February 17, 2011

Date Night Pudding

What's a girl to do when her boyfriend calls her and says "Babe, don't cook dinner. Let's go out"? Well, if you're me, and you know that the desserts at Mellow Mushroom won't satisfy you (even if the tempeh hoagie will), you just whip up some pudding. This dessert is best enjoyed curled up on your couch with your loved one while killing brain cells with American Idol, I mean, staring into each other's eyes.

 Chocolate Coconut Pudding
Makes 3-4 servings
  • 6 oz / 170 g bittersweet chocolate or about 1 1/2 chocolate bars
  • 6 oz / 170 g light coconut milk or about 3/4 of a cup. (You can also use full fat coconut milk, some other non-dairy milk, cream, etc. The richer the liquid the more decadent the pudding.)
  • 6 oz / 170 g silken tofu (shhhh, nobody needs to know!)
  • 1/4 cup maple syrup or agave
  • 1 teaspoon pure vanilla extract
  • 1 pinch of salt
  • 1/2 teaspoon cinnamon
  • Optional: coconut flakes and mint for garnishing.
1.  Break the chocolate up into pieces and put it in a microwave-safe bowl. Microwave it for 30 seconds, stir and repeat until all the chocolate has melted. 

2.  Stir in the coconut milk, maple syrup, salt, cinnamon and vanilla and stir until well combined. Set mixture aside to cool until room temperature, stirring occasionally. 

3.  Break up the tofu into pieces and put it in the food processor. Pour in the cooled chocolate mixture. Blend until completely smooth, which could take several minutes, scrapping down the sides with a spatula if needed.

3.  Serve in bowls or fancy glasses. Garnish with coconut flakes and mint if you'd like.  Chill in the fridge for about 30 minutes before serving or just enjoy immediately if you need pudding NOW!

Wednesday, February 16, 2011

Herb and Olive Focaccia

I'm not really a dunker. I think that dunking generally makes things soggy, which isn't a texture I enjoy. I even eat cereal in a hurry to minimize sogginess. Austin, on the other hand, is a serial dunker. So when I decided we were having ministrone for dinner and realized we didn't have any bread I decided I had to do something about it. Enter the focaccia.

The focaccia recipe below was inspired by Michael Ruhlman's book "Ratio". In it he attempts to demystify cooking by providing you with ratios that unchain you from cookbooks and open the door to thousands of recipes. The book has chapters dedicated to doughs, sauces, stocks, custards and sausages. For example, the basic bread ratio is 5 parts flour to 3 parts water by weight. The dough can then be salted to taste. But how much yeast should I use?, you ask. Well, it depends. Less yeast will result in a longer rising time but will yield a more flavorful bread; more yeast will make your bread rise faster but the bread will be slightly less flavorful. If all this sounds interesting and freeing to you I highly recommend the book. It essentially teaches you to just relaaaax. If your bread is an epic fail it's no big deal. You'll get it right next time.

Armed with the 5:3 ratio I decided I would make a focaccia, which I'd never done before. I had some herbs de Provence kicking around from another bread I made as well as some unopened kalamata olives staring at me from the cupboard, both of which made it into the bread. The result was savory, delicious and perfect for Austin's dunkfest.


Herb and Olive Focaccia
  • 20 oz or 565 g of all purpose flour (bread flour would be better, but don't worry if you don't have it, I didn't!) or about 4 cup plus some extra for flowering surface.
  • 12 oz, 340 g or scant 2.5 cups of water.
  • 1 package of active dry yeast or one 0.6 oz or 17 g cake of fresh compressed yeast. (If you'd like to use rapid rise or instant yeast just add it to your dry ingredients. Instant yeast doesn't require you to let your bread rise a second time.)
  • 1 tablespoon of herbs de Provence. (You could also use thyme, rosemary, a combination thereof or another herb mix of your choice).
  • About half a cup of chopped kalamata olives (any olive will do).
  • 2 teaspoons of salt plus extra for sprinkling on top.
  • 1 tablespoon of nutritional yeast (absolutely optional, I added it for some "cheesy" flavor).
  • 5 or so tablespoons of olive oil.
1. Heat the water in the microwave for about 45 seconds, until warm but not hot. If using active yeast, dissolve it in the water and wait until it forms foam on top, which should take 5-10 minutes.
2. Mix your flour, herbs, salt and nutritional yeast (if using) in a large mixing bowl. Once the yeast has formed foam, add it to the dry ingredients. Once all the flour and water are combined, drizzle about 2 tablespoons of olive oil into the dough. Now it's time for your arms to get a workout. Knead the dough (like you mean it!) on a floured surface for 10-15 minutes. Take your frustrations out that dough ball, meditate, sing...just don't skimp on your kneading! Kneading develops the gluten in the flour which gives the bread dough elasticity. If the dough is too tacky, add some more flour, if it's too dry add more water.
2. Form a ball with the dough, rub the outside of it and the inside of the bowl with 1-2 tablespoons of olive oil and leave it in a warm place to rise until double in volume. Yeast likes heat so the warmer the environment the quicker your bread will rise. I left mine on top of a 200 F oven for about 2 hours.
3. Preheat your oven to 400 F. Once the dough has risen, punch it down and form it into either a round disk or a rectangle that's about 2 inches thick. Dimple it by pressing your fingers into it. Put the olives on top and sprinkle with about a teaspoon of salt and a tablespoon of olive oil and and let it rise again for about another hour. If you used instant yeast you can skip this second rise.
4. I baked my focaccia on a baking sheet dusted with cornmeal. You could also bake it on a greased or floured sheet or on a pizza stone. Bake until brown on top and hollow sounding when tapped, about 20 minutes in my case.

I know homemade bread takes some time but the end result is well worth it. Also, this recipe is almost infinitely variable so just use whatever toppings (thinly sliced onions, dried tomatoes or chipotles in adobo) or herbs (cilantro, parsley, rosemary or thyme) you have on hand. Just remember to minimize the bread making drama and maximize the fun.